Tuesday, November 22, 2016

Vim Plugin: Subnet Search

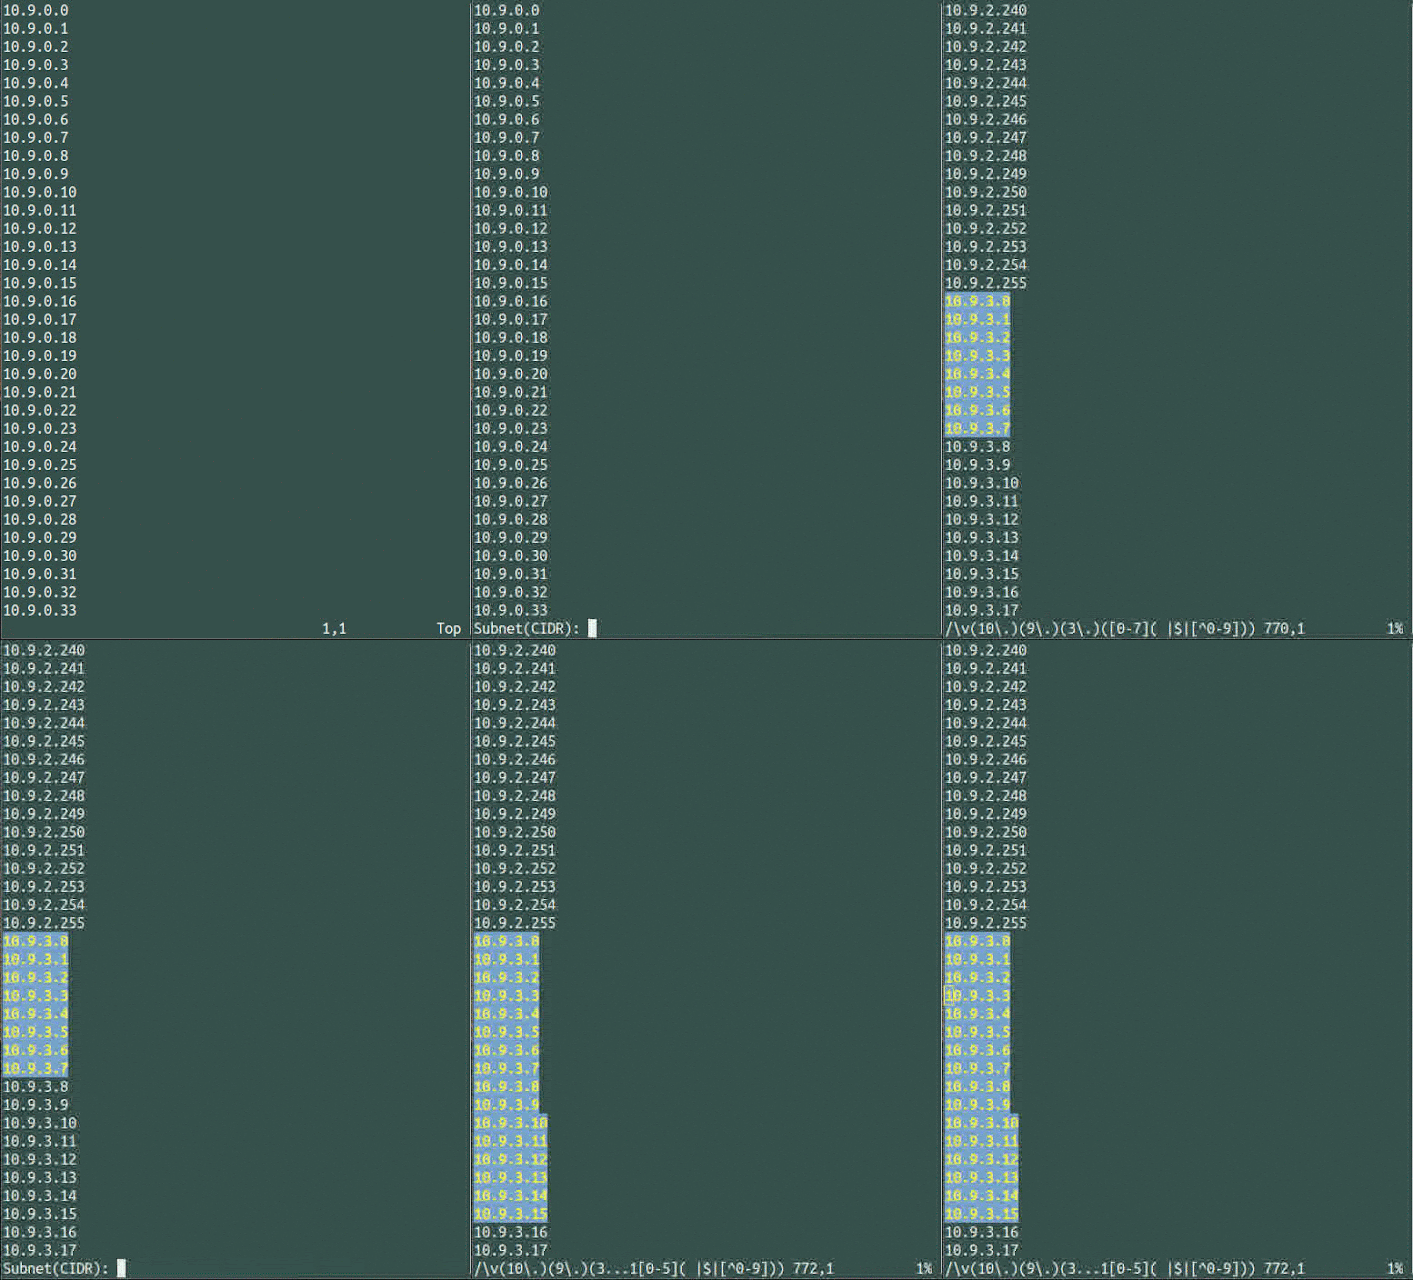
Finished the subnet search plugin for vim written in python.  Given a CIDR subnet, it will generate a regular expression to match all ip addresses in that subnet:


In the example above, 10.9.3.0/29 is given as the CIDR subnet, and all the IP addresses within that subnet, including the network number and broadcast address, are highlighted.  If they were spread out amongst the file, just repeating the last search in vim using the '/' key and return will jump to the next occurrence.  Pretty handy in those cases whereby you want to search for or see all the IP addresses within a subnet.  It does go through a list of IP addresses for a subnet, so a /8 or any large subnet may take some time depending on the speed of the machine it's being run on.  It's at vim.org and github. It uses python 2.7, and the backported IP address module.
Wednesday, December 18, 2013

Getting pymssql to work

The goal at the outset was to get pymssql working with peewee, more specifically pwiz.py so I can build a set of class objects from a remote sqlserver database.

When I first tried to use pymssql to actually retrieve data from a mssql server, I tried using pymssql 1.0.2 with FreeTDS 0.91.  Nothing came back. 

I tried queries like:

"select * from sys.tables"

or

"SELECT name FROM sysobjects WHERE (OBJECTPROPERTY(id, N'IsTable') = 1) AND (name NOT LIKE N'#%') AND (OBJECTPROPERTY(id, N'IsMSShipped') = 0) AND (OBJECTPROPERTY(id, N'IsSystemTable') = 0) ORDER BY name ASC;"

 I tried the same queries using tsql, and they returned results as expected.

The latter is the query that QCubed uses to get a list of tables from mssql, but the former works too.

I checked the traffic, and pymssql was connecting and sending queries just fine, and the remote server was sending results just fine, but nothing would show up in python.  Fetchall() returned nothing.

So I found this launchpad bug entry, and in it someone was using pymssql version 1.9.912  Removing 1.0.2 and installing 1.9.912 worked.  The other suggestion in the thread to pass multiple arguments in 1.0.2, did not work.  I downloaded the tarball from here, and 'python setup.py build' 'python setup.py install' worked.

Note1:  This was on scientific linux 5.7, python 2.7.2.  Work with pymssql & peewee follows.

Tuesday, February 7, 2012

Charge your mobile phone from your campfire stove - Biolite Stove

A camping stove that can cook with an open fire and produce enough electricity to charge a cellphone: BioLite Campstove.

Just fill it with brush and it starts making electricity which is also used to run a fan so the fire gets really hot quickly:


Saturday, December 31, 2011

Network Learning Resources

Here are some networking resources and tools I've found useful:
  • VisualLand - a combination network simulator, Animated howto, tutorial, general-info site
  • 9tut - a cisco certification oriented site with practice test resources
  • RouteMyWorld - a ccna/ccnp blog
  • PacketLife - a general network engineering blog
  • IP Calculator - a subnet calculator
  • CentralOps - a general purpose DNS/Traceroute/ServiceScannet/Whois utility site
  • The Net - CCIE blog with GNS3 labs
  • All About Networking - blog with cisco lab links and gns3 labs
  • Free CCNA WorkBook - CCNA exam prep materials
  • PCAPR - Online Packet Captures + social networking.

Wednesday, October 5, 2011

Converting CHM to PDF

I got chm2pdf working.  It came from google code, and needed chmlib, pychm, and htmldoc.  chmlib and htmldoc I installed using brew, and pychm I got from its home page.  pychm installed nicely with just "python setup.py build" and "python setup.py install".  Same for chm2pdf.  Really couldn't have been easier.

Then just "chm2pdf --format pdf14 --color --webpage filename.chm output.pdf" worked.  The --book option does not work, but the resulting pdf was complete with chapters, images, and everything.  It opens nicely with Preview, which is very cool since Preview is capable of a fairly full featured set of annotations which can be saved to pdf files.

Tuesday, August 23, 2011

Installing Tinycore linux in virtualbox for GNS3 IPv6

The 0.8.1 GNS3 release now easily supports virtualbox hosts, and Tinycore linux is a nice easy way to add hosts to your topologies without consuming hefty amounts of memory and CPU.  First, download it from the tinycore linux downloads site  Then create a vm in virtualbox with at least 64 meg of memory, and a gig or  two of drive space (I created it as linux other, since there wasn't a tiny core linux type).  Set that vm to boot from the iso downloaded from tinycore linux earlier.  Then boot it.  It should come up quickly.  The follow steps will install a bootable tinycore on the VM's drive:

  • Go to the app browser (click anywhere on the desktop and select it from the 'system tools' menu) click the "Connect" button to get a list and search for cfdisk.  Click the "go" button to download and install it.
  • Then search the app browser for grub, and download/install grub-0.97-splash.tcz
  •  Then open a terminal (click anywhere on the desktop and select it from the 'system tools' menu)
  • enter "sudo su" to get to root.  The prompt should be "root@box"
  • type "cfdisk /dev/hda" to make a new partition.  Select 'new', and 'bootable', then 'write'.  After that, quit
  • type "mkfs.ext3 /dev/hda1" to put a filesystem on the new partition
  • type "reuildfstab" so its available to mount.
  • type "mount /dev/hda1" to mount it.

The bootable parts are either in /dev/hdb or /dev/hdc.  Try mounting either with "mount /dev/hdb" or "mount /dev/hdc".  Then look in /mnt/hdb and/or /mnt/hdc for a boot directory that has a file named "bzImage"  We'll assume its in /dev/hdb for now.  Continuing on:

  • Type “mkdir -p /mnt/hda1/boot”, then type “mkdir -p /mnt/hda1/boot/grub”
  •  Type “mkdir –p /mnt/hda1/tce”
  •  Type “touch /mnt/hda1/tce/mydata.tgz”
  • Type “cp -p /usr/lib/grub/i386-pc/* /mnt/hda1/boot/grub/”
  •  Type “vi /mnt/hda1/boot/grub/menu.lst”, type “i” to enter Interactive mode, then type:
default 0
timeout 5
title tinycore
kernel /boot/bzImage quiet
initrd /boot/tinycore.gz
  • Press <Esc> then type “:x” to save and exit vi
  • Type “grub”  once at the grub> prompt, type:
root (hd0,0)
setup (hd0)
quit
  • Type "cp /mnt/hdb/boot/bzImage  /mnt/hda1/boot/"
  • Type "cp /mnt/hdb/boot/tinycore.gz /mnt/hda1/boot/"
  • Type “umount /mnt/hda”
  • shutdown, and remove the tinycore iso from the VM's storage devices.
  • Start the VM.

If you want IPv6, go to the app browser, and search for IPv6.  Download/install ipv6-2.6.33.3-l1-rt19 and ipv6-2.6.33.3-tinycore.  Reboot, open a terminal and enter the command "ifconfig", if you see an IPv6 address, you're now able to communicate via IPv6.  Try ping6 to hit an IPv6 address you know will respond.  There are tons of other goodies like firefox (did I say 64M of RAM above? Oops), dillo, traceroute, openssh, tftp, nmap, ethtool, tcpdump, web servers like lighthttp, - the list goes on and on.  One thing I haven't done is figure out the virtualbox guest extensions for tinycore, and so mouse focus is a bit dodgy, although far from unworkable.

Friday, August 5, 2011

Building QEMU for GNS3 under OSX

I have GNS.74 and wanted to run qemu to put hosts on network simulations.  I found I had to maunally start qemuwrapper with:

python /Applications/GNS3.app/Contents/Resources/qemuwrapper.py


Which initially worked - I could add qemu hosts (with the 3.4 qemu images from gns3.net), start them, and get a qemu console.  However, I found that once I added a router to the topology, I could not start or restart qemu hosts - a qemu console window would just appear and vanish too quickly to see anything.  GNS3, conveniently, logs little to nothing.  Up to this point, I had installed qemu 0.14.1 via brew, so I uninstalled it.  Then I set out to build qemu with the UDP Multicast patch. I downloaded qemu-0.13, downloaded the udp-multicast patch, and patched the multicast patch file after putting it in the untarred/ungzipped qemu directory:

patch -p1 -i qemu-0.13.0-mcast-udp.patch

Then configged it:

./configure --disable-kvm --enable-cocoa --disable-sdl --target-list=i386-softmmu

then just make, sudo make install (okay I did sudo make -n install to see what make would do first)

I also got an IPv6 qemu image so I could do IPv6.  This is a 4shared.com link, so it may die of old age in future.  As of this post, (Aug 5, 2011) it worked.

That did the trick.  Qemuwrapper still has to be manually started, but now qemu hosts start up right alongside routers in a topology.

Thursday, July 7, 2011

The list for Natty

Been installing Natty on Virtualbox, and this is a summarized order of what I've been doing:

  1. Base install, no third party or downloading updates, use liveCD to configure proxies for system & wget in /etc
  2. Install guest additions.
  3. Reboot, configure proxies in system and for wget in /etc, update/upgrade
  4. Enable proposed updates and backports, upgrade
  5. Add restricted extras, sun java (-w- fonts), gvim, remove openjdk (can't function without gvim)
  6. Install Dropbox
  7. Add repository for svn build of wireshark, install wireshark, tshark
  8. Add repository for gtk rgba, update/upgrade
  9. Add repository for Ubuntu Tweak, update/upgrade
  10. Add repository for Emerald, did update/upgrade (did not install emerald)
  11. Install compiz settings manager, compiz/fusion plugin extras
  12. Install gtk2-engines-nodoka gtk2-engines-aurora gtk2-engines-equinox
  13. installed Murrine7 theme
  14. Opened compiz settings, turned on blur windows.  Changed to Murrine7 theme.   Blurring worked.  Changed blurring to gausian.  Tailed .xsession-errors while doing this step.
  15. Installed Emerald, used emerald --replace to use it.
  16. Installed Fusion Icon & plugins, Win2-7 icon theme.  So far so good.

Tuesday, May 31, 2011

YAWAS - Yet another web annotation system

http://www.keeness.net/yawas/index.htm

I don't know why it's called "yet another" - its really the only one.  The next best one is wiredmarker, which is great, but uses a local database, so you need to put its database on dropbox for the annotations to be portable.  If like myself you surf from more than one computer, then yawas is nice not only because it uses google bookmarks so its portable but works for firefox and chrome.  The nice thing about using google bookmarks over, say diigo, is that getting a google account is less obtrusive than diigo or the other portable web annotation sytems (diigo, shiftspace, sidewiki, webnotes, stickis) and yawas also doesn't need you to install a fricking toolbar, and doesn't pop crap up in your viewing space either (I'm looking at you shiftspace you topheavy ankle chain.)  I hate toolbars.

However, I like yawas - just install it and go.  All you need is a google account, and that's it.  Google accounts, although I don't feel very comfortable with them, are better than the other account alternatives because google doesn't try to shove social bookmarking down your throat 24/7 like the others do.  There's a wikipedia entry on web annotations, but doesn't have the two best ones, yawas and wiredmarker.

Wednesday, May 18, 2011

Things to do after installing ubuntu

To make Ubuntu more useful, here's what I've been doing after installing:

  1. run updates
  2. enable additional drivers
  3. set resolution
  4. Enable universe, restricted, multiverse under "Ubuntu software"
  5. run update manager
  6. Enable Canonical Partners under software
  7. install ubuntu restricted extras
  8. enable pre-released and unsupported updates
  9. enable download all updates in the background
  10. run update manager
  11. install greasemonkey and adblock with software manager
  12. install checkinstall, gvim, epiphany, chromium, gnumeric, dia, inkscape, gimp, pdfedit, xournal,decrypt file, gpa, openshot, gns3, wireshark, tshark,murrine themes, community themes, preload
  13. added ppa for nvidia drivers (details here) and install
  14. added ppa for webkit/epiphany (here)
  15. added ppa for wireshark/tshark/dia (here) (these do daily updates :-)
  16. installed rgba ppa (here) but don't enable it yet
  17. installed dropbox
  18. added elementary desktop ppa (here)
  19. installed elementary icons, theme, artwork, gnome artwork, colors (used synaptic - the ubuntu software center doesn't handle theme/artwork well)
  20. Installed localepurge, bleachbit, gnome activity journal
  21. went here to fix elementary dark panels and firefox elementary theme
  22. installed compiz fusion from here
  23. added gns3 ppa from here
  24. added wine ppa from here and installed wine 1.3
  25. added ubuntu tweak ppa from here (page at ubuntutweek.com here)
  26. added ppa for gnomenu from here

    Thursday, March 31, 2011

    Converting Kindle to PDF

    There is a tool (unswindle) to remove DRM from kindle files, which uses the Kindle4PC application and darkreverser's mobidedrm.  But, those two need to be in the same directory, and there is a handy download that does just that here (from darkreversers's blog at the bottom)  The tools_v3.8 has a bunch of great tools for DRM-crippled content, including plugins for Calibre.  However, it needs the 1.01 beta version of the K4PC program, and if you're using windows you'll need to install python at least 2.6 ( I used activestate python 2.7)

    If the latest version of Kindle4PC is installed you'll need to uninstall it. Open it, unregister, and tell it to remove licensed content, then remove the "My Kindle content" directory.  Then uninstall Kindle for PC.  Then install the 1.01 beta version (from here for example, but there are versions all over the place).

    Install the 1.01 beta version, launch it, and make sure to goto the settings and tell it not to update itself.  Otherwise unswindle won't work - it will launch Kindle for PC which will promptly update itself to a version that unswindle can't work with.  Then register it, and let it download your kindle books.  Close it and relaunch it to make sure it won't try to update itself.

    Once you're determined that K4PC won't update itself, you can goto the tools v3.8 and goto the kindlebooks_tools folder.  If you're using windows goto the kindle_4_pc_windows folder, and double click the unswindle_v7 icon (if you've installed something like activestate python it should launch) which will then launch the Kindle for PC program.  Once K4PC has launched, selected the book you'd like to unlock, then quit K4PC.  Then unswindle will ask you to save the DRM-free file.  Its in a .mobi format, and can now be opened with Calibre and converted if you wish.   Just remember if you convert it to PDF, Calibre will format it as though it was a kindle, not a regular PDF.  Then you can use something cool like xournal to annotate the PDF to you're heart's content.

    Friday, February 25, 2011

    JohnsBlog.name is now up and pointing to here at blogspot. More to come later.